
Keeping your home cool
Keeping your home cool
Extremely hot summer spells are becoming common in parts of the UK. Rapid global action to reduce carbon emissions would reduce the chance of periods of extreme heat. However, our emissions so far have already given us a greater risk of heatwaves. It’s therefore important to consider home cooling in summer as well as heating in winter.
It is of course possible to bolt-on a home cooling system, such as an air conditioner. However, these tend to use a lot of electricity, leading to higher bills. Adding lots more electricity demand onto the grid will also make it more difficult for us to get to 100% renewable energy. As with heating, measures to reduce energy demand are the best option. A combination of steps will help you keep your home cooler:
- Avoid internal heat gains
- Add suitable shading
- Insulate well
- Use night-time ventilation
- Make use of ‘thermal mass’
Avoid Internal Heat Gains
Once you start looking you’ll find many sources of unwanted heat. Addressing these will reduce the need for mechanical home cooling. Most electrical appliances give off some heat, so use them efficiently and (if possible) switch them off when they’re not in use.
If you have a hot water cylinder, make sure it’s well-insulated – and that hot water pipes are as well. The uninsulated pipes can lead to more heat loss than a modern efficient cylinder.
Appliances that you’ve bought in recent years should already have very low standby power use. EU regulations brought this down to half a watt in 2013. However, smart devices connected to the internet can use much more – especially when synchronised for greater control. Some electrical goods have an internal transformer, and some have one on the cable. You can tell how efficient the transformer is by how hot it gets. Switching things off when not in use is the best way to prevent indirect heat gains.
The phase-out of incandescent and then halogen light bulbs has removed a big source of heat. These bulbs are inefficient because most of their electricity use becomes heat, not light. If you upgrade any remaining halogen or incandescent bulbs to LEDs you’ll reduce overheating as well as running costs.
Out of the frying pan…
Your kitchen is usually one of the main sources of overheating, especially with an open plan layout. Use efficient cooking techniques – always have lids on your pans, or use a pressure cooker. A modern induction hob is much more efficient at transferring heat to the pans. That means less wasted heat as well as more control. A microwave oven is more efficient than a conventional oven because it heats the food and not the surrounding air.
The heat sink at the back of your fridge or freezer expels the extracted warmth. If your fridge is much bigger than you really need, then this means more waste heat. Upgrading an old fridge to make savings on your bills will also help you to keep your kitchen cooler. If possible, put your freezer in a connected garage or utility room so you have less unwanted heat in the kitchen.
Shading
You could use blinds to reflect incoming short wave solar radiation back out as long wave radiation. However, ‘low-e’ glass (with a low-emissivity coating) is standard in modern windows. This will stop long wave solar radiation going out through the glass, making blinds less effective. However, a suitable blind will still reflect some of the sunlight as short wave radiation.
If you can add external shading this is more effective, as it prevents sunlight coming through in the first place. You may need to check with local planners before adding external shading, especially in designated areas like National Parks.
External shading could be with window shutters or louvres. Shutters can be difficult on modern outward opening windows, but easier for traditional sash or sliding windows. A simple louvre could have timber slats at a fixed angle, to only block the higher summer sun.
An awning can be retracted or removed outside of summer, or a permanent overhang may be easier. Something permanent needs to be carefully sized, to still allow in the lower angle of sunlight from autumn to spring.
Shelter from vegetation can be planned for by growing deciduous trees, or having plants on a trellis over windows.
Ventilate and Insulate
As well as keeping a house warm in cold weather, decent levels of insulation will also keep it cool in the summer. It will complement the other measures outlined here, as once you’ve avoided internal heat gains and brought in cool air overnight, a well-insulated building will keep the this cool air inside the building.
Opening windows during the day will bring refreshing air in, but this incoming warm air will gradually heat up the building. It is best not to leave windows open if rooms are empty – but this needs to be in conjunction with some shading to prevent heat gain through the glass. In an occupied room, opening a window for just a few minutes will bring some fresh air in.
Use Thermal Mass
Night-time ventilation works best in houses that have lots of ‘thermal mass’. What this means is thick stone or brick walls, or exposed solid floors. These materials take a while to either heat up or cool down, so in summer you want to keep them cool as much as possible. If your house does not have much thermal mass, then it will tend to overheat more quickly.
To benefit from thermal mass, you can use the above methods to minimise gains during the day and ventilate at night to allow the mass of the buildings to cool down as much as possible.
In a house that does not have mechnical ventilation you will need to make some judgements about how to best provide secure ventilation at night. For good night-time cooling you generally need to open a reasonable proportion of your total window area – perhaps about 25%.
Further information
CAT’s short courses on building and refurbishment will cover many of the issues above in much more detail. See also our other pages on eco-renovation for lots more advice on insulation, ventilation, and more.
Related Questions
Can a conservatory make my home more energy efficient?A conservatory can be a great way to use solar power. And as well as saving energy, it will provide a pleasant extra room. The big thing to remember is that a conservatory should never be heated – or all the benefits will be lost!
A conservatory is a ‘buffer’ against the outside weather – the temperature will stay a few degrees warmer than it is outside. For much of the year a conservatory is a very nice place to be. However, you’ll need blinds or shutters to prevent overheating in high summer. Growing seasonal vines or creepers across the roof is also a great way to get summer shading. A south-east facing conservatory is best, as it gains from the morning sun but will be slightly shaded from the westerly sun at the warmest time of day.
A conservatory can also act as a lobby for coming and going from the house, so reducing draughts and heat loss. Fresh air coming in to the house via the conservatory will be warmed on its way through. This is good, because lots of the heat loss from a well-insulated house is through ventilation.
A danger with conservatories is that they come to be relied upon as an extra living space in the home. As the coldest months come around, a few degrees above outdoor temperatures is still quite chilly. This leads to the temptation of putting a heater or radiator in, a move that would make your home an energy guzzler! It is impossible to insulate such a highly glazed room sufficiently,so if you want to maintain energy and monetary savings, you’ll need to resist temptation and keep it unheated.
Shutting the conservatory off from the main part of the house with solid doors, or glass doors with thick curtains, will stop heat escaping at the coldest times of the year. Plenty of ‘thermal mass’ within the conservatory will store the heat gained for longer. So if it is being added to an existing brick wall, much of this could be kept for this purpose. Alternatively, a solid stone or brick floor will soak up and then slowly release heat as the evening cools down.
For a sunny but heated space in your home, consider instead a sun-room. This would have double glazing throughout with an insulated solid roof and well-insulated curtains or blinds. An insulated, heated sunroom would need to meet Building Regulations, so the balance of windows and insulated roof or walls would need to be designed carefully.
A conservatory may seem cheaper to build than a proper extension, but this is not always the case – they can be more costly per square metre than the rest of the house. And if it ends up as a heated room then the less obvious heating costs will not be at all cheap!
There are basically three different types of insulation material:
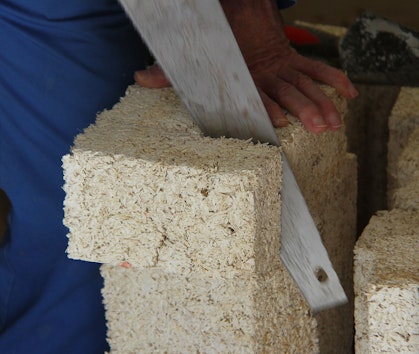
- Organic – those derived from natural vegetation or similar renewable sources, which tend to require a low energy use in manufacture (a low ‘embodied energy’). Examples are sheep’s wool, cellulose, cork, wood fibre, and hemp.
- Inorganic – derived from naturally occurring minerals which are non-renewable but plentiful at source. Likely to have a higher embodied energy than organic materials. Examples are mineral/glass fibre, perlite and vermiculite (from volcanic rock) and rigid foamed glass.
- Fossil organic – derived by chemical processes from fossilised vegetation (oil) – a finite resource. Fossil organic insulation materials such as expanded polystyrene and polyisocyanurate or phenolic foam are highly processed, resulting in a high embodied energy.
Which is best?
If possible it is better to choose insulation materials that have not been heavily processed as this will reduce the carbon footprint and environmental impact of your home. But it is far better to install cheaper inorganic or fossil organic materials with the right physical properties and a low thermal conductivity than to install nothing at all.
In many cases, organic insulation material can be applied instead of inorganic or fossil organic, but there are exceptions. For example, there is not an organic insulation material suitable for cavity wall insulation.
Think also about the ease of installation. Loose fill insulation is quick to put in in lofts, but cannot be DIY installed in anything other than a flat place. Rigid boards and batts will come in certain sizes, but need to be cut to shape if you have some unusual spaces. Some materials can be cut with a knife, but a few will need a saw. Some mineral wool now comes in a thin foil or plastic wrap, to protect from the fibres. You should still wear a face mask when installing any type of installation, as small fibres of any kind are best not inhaled.
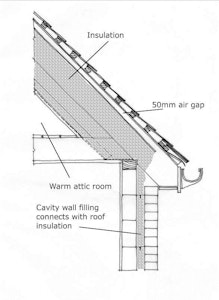
If you have cavity walls and they haven’t been insulated, up to a third of the heat produced in your home could be escaping. Insulation should reduce your heating costs and carbon emissions from your home significantly. The insulation itself needs to be suitable for the conditions inside a masonry cavity, and so choices are limited to three options: blown mineral wool, plastic beads or plastic foam.
Cavity wall insulation should cost only a few hundred pounds and recoup this installation cost within 3 or 4 years. With gas-fired heating, you’ll reduce annual carbon emissions by almost half a tonne per year. This makes it several times better than installing a solar PV roof in terms of both carbon savings per pound spent and payback time. Both costs and savings will be higher for a detached house.
The installation process must include an assessment to ensure that the construction is of a suitable type. Installers should work through an accredited scheme and guarantee the installation for 25 years. It may take about 3 hours to inject the insulating material into the cavity. For installers, see the Cavity Insulation Guarantee Agency (CIGA), National Insulation Association, or British Board of Agrément.
Some homes may be classified as ‘hard to fill’ cavities – perhaps too narrow or uneven to fill easily. Insulation may then be more expensive to install (perhaps 2 to 3 times as much), or it may not be feasible – external or internal insulation may then be better.
A Which? Magazine survey in 2011 found that some installers were not undertaking adequate assessments. According to industry guidelines, they should inspect all external walls thoroughly to check for cracks/defects, check all internal walls to check for any existing damp, and do a cavity check (with a drill hole) on all walls. A proper survey like this is likely to take an hour. Do ask a few companies around to give quotes.
Cavity wall insulation should not cause problems of dampness, but a proper assessment of the property is needed to ensure it would be suitable. If your home is towards the west coast of the UK, more prone to wind-driven rain, then it might be unsuitable for cavity insulation if it’s in a very exposed, unsheltered position and there are cracks in the external wall. For those few homes in this position, measures could taken to prevent damp risks – for example by putting extra protection in the form of boards or tiles on the exposed walls. There will be a cost to this of course, and it should be compared with quotes for options such as internal or external wall insulation.
BRE (Building Research Establishment) research in the 1990s showed that cavity wall insulation when assessed & installed properly does not lead to an increased risk of damp. The study found that the structural condition of the walls was the most important factor in damp problems – for example, badly filled mortar joints or ‘dirty cavities’ (where, during construction, mortar has dropped down inside the cavity – i.e. if too much is used). Over time, this can cause problems with damp-proofing.
The U-value is a measure of how many watts (representing the rate of flow of energy) pass through one square metre (m²) of a construction detail (such as a wall) for every degree difference in temperature between the inside and the outside. Temperature is measured in kelvin, and 1K = 1°C (degree centigrade).
As an example, a U-value of 6.0W/m²K for a single glazed window means that six watts will be escaping through each square metre of glass when the temperature difference is one degree. If it is 20°C in the house and 0°C outside, then the heat loss is 20 x 6 = 120 watts per square metre.
U-values are generally used to describe the thermal performance (heat loss) for a section of construction that involves several materials – such as a wall made up of timber, insulation, board & render.
Thermal conductivity
For individual materials, such as a type of insulation, you’ll come across the term ‘thermal conductivity’, also known as a k-value or λ-value (lambda). This is the rate at which heat flows through a particular material, and good insulation will have a low thermal conductivity. It is measured in watts (heat flow) per metre (depth of material) per degree difference (inside to outside), so the unit is W/mK.
Most natural insulation materials (hemp, wool, recycled paper or textile) will have a thermal conductivity of about 0.035 to 0.040 W/mK, which is similar to the performance of conventional mineral wool insulation. Foil-backed plastic foam insulation boards are slightly better, with thermal conductivity about 0.023 W/mK. So about 100mm of the plastic foam board will give equivalent insulation value to about 150mm of the various woolly types.
A ‘cold loft’ roof, with the insulation at ceiling level (laid flat in the floor of the loft) is generally the most economical, and easy to install. However, if you want to insulate in the slope of a roof in order to make use of the space, then here are some tips.
The most economical way of achieving a good thickness of insulation in the roof slope is to have two layers of timber, one supporting the roof finish and another supporting the insulation and ceiling finish. Batts or loose fill insulation is generally better between rafters, because it will give a tight fit. Otherwise rigid material has to be very precisely cut to fit well.
To reduce cold-bridging, timber I-Beams or I-Joists can be used when adding new beams or building a new home.
In an existing roof (with rafters supported on roof beams), the second layer of timbers (ceiling joists) can be hung off the rafters using hardboard, ply or timber ‘hangers’, or nailed crosswise to them, or they can span between the roof beams. This technique can also be used with flat roofs.
An air space of 50mm must be left between the insulation and the tiling felt, unless the felt is of a low-vapour resistance type. If using a breathable membrane, with insulation up against it, then above the membrane you would put counter battens (top to bottom) as well as the standard battens (side to side), for adequate ventilation beneath the tiles. Sometimes, a breathable membrane is used with only standard battens, with the membrane slightly draped between rafters to allow ventilation – in this case an air gap of about 25 mm would be needed between membrane and insulation.
Thin wood-fibre boards (22 or 35mm thick) can be used as an alternative to a membrane under tiles. When re-roofing, the fibre-board is laid over the rafters, and then counter battens (in line with rafters), and then standard battens to fix the tiles/slates to. Thicker wood fibre boards can also be used, to give more insulation and achieve a lower U-value (to minimise heat loss).
A ‘warm roof’ will have waterproof insulation on the outside of the structure (so the main timbers are on the warm side of the insulation). It’s a useful way of upgrading an existing roof when internal room height is at a premium. On a sloping roof, the tiling battens are supported by rigid insulation and fixed through to the rafters by special screwnail fixings. The insulation must be waterproof, such as cork, foamed glass or closed-cell plastic foam board – these will tend to be more expensive than the standard insulation materials for internal use.
You can also read more at the webpage of the Energy Saving Trust, on Greenspec’s pages about ventilated and unventilated roof insulation options, and in a guide from Historic England.
The first two of the following four methods involve adding insulation to the outside of the roof, so will be suitable if there is little headroom underneath, or if access is difficult. The second two involve adding insulation underneath the roof. If insulating on top of a flat roof, make sure that it still drains well so that water does not pool on top.
Upside Down or Inverted Roof
An ‘upside down’ roof uses waterproof insulation on the outside of the building structure. The insulation is laid over the existing waterproof membrane and held down with something – which could be pebbles, turf (for a green roof), paving slabs, etc. Suitable insulation materials will tend to be a bit more expensive, and include cork, foamed glass and closed-cell plastic foam. You’ll need to check that the structure can bear the weight of the insulation and finish. This option keeps the existing membrane, but there is a risk that water will percolate through the insulation and so cool down the roof deck – causing condensation.
Warm Roof
A warm roof will have the insulation laid over a vapour control layer (itself over the roof deck), with a membrane laid over the insulation and suitable finish on top. You’ll need to check that the structure can bear the weight of the insulation and finish. If you are replacing the roof membrane anyway, then this will be a better solution than the ‘upside down’ roof (above), as it will keep water above the insulation and so keep the roof decking warm. You could still keep the existing membrane underneath the insulation if it would be difficult to remove.
Cold Roof
The insulation is put between the roof joists. A ventilated gap needs to be retained between the top of the insulation and the roof decking, to avoid condensation build-up. It can be difficult to get adequate ventilation, so this method is often not recommended.
Internal Insulation
A method similar to dry-lining of walls can be used, with a plasterboard/insulation board added to the underside of the internal roof, below the joists.
Traditionally, solid floors were laid directly onto soil. This relies on the ground underneath being kept dry, usually by it being higher than the ground outside the building, and by having adequate drainage.
The most common method now used is to have a thick concrete slab laid on a damp-proof course (e.g. a polythene membrane). A layer of polystyrene insulation is then finished with sand/cement screed and tiles or board.
For a low-impact alternative to the above you could look into using recycled aggregate in the concrete (rather then newly quarried material), and perhaps using stabilised earth as the screed. You could also consider using recycled polythene or bitumen for the damp-proof course.
A solid floor of stabilised earth or limecrete should have a solid insulation material below it, such as cork, perlite or foamed glass, with recycled polythene vapour check and damp-proof membrane (DPM) below this.
Try to achieve at least 150mm of insulation for a solid floor. Insulation should be placed around the edge of the floor, and the floor finish supported on some sort of rigid insulation. Possible materials include cork, perlite (volcanic glass), lightweight expanded clay aggregate (‘Leca’), foamed glass (slabs or granules), fibreboard, mineral wool boards, or plastic foam of some sort. A vapour check layer will normally be required to prevent condensation occurring within the insulation layer.
Another possibility is a hemp & lime (or ‘hempcrete’) floor. Lime has a much lower environmental impact than cement, so if you can use it place of cement in mortars or concrete you will be reducing the ’embodied energy’ of the floor and the carbon emissions from construction. The hemp provides the insulation. See for example the details of how we insulated the WISE building at CAT.
If you are redoing a floor, then you may have the chance to consider underfloor heating. Because it runs at a much lower temperature than standard radiators, wet underfloor heating is more efficient and provides a more comfortable type of heat. It’s particularly appropriate for use with heat pumps, as these need to supply low-temperature water to run efficiently.
You can also see some information and examples on the Energy Saving Trust and Historic England websites.
If you can access the floor from below via an unheated cellar or basement it will be easier, otherwise you’ll have to lift the floorboards (which requires care to avoid damaging them).
225mm of a renewable or mineral fibre type of insulation is a decent amount. Make sure you keep good ventilation to the underfloor space beneath the insulation – with vents at either side for air flow.
Batts or loose fill insulation is generally better between joists because it will give a tight fit. Otherwise rigid material has to be very precisely cut to fit well.
Renewable insulation will need to be protected by a breathable membrane to protect it – if the floorboards are not well sealed. See the website of the supplier of insulation you’re using (or call their advice line) for advice on the type of membrane that would be needed. Natural insulation materials include hemp, sheeps wool, recycled textiles, recycled paper (loose fill), and wood fibre.
Loose fill insulation can be carried between the joists on a membrane or netting nailed to floor joists or on a low-vapour resistance board (for example softboard, a fibreboard bonded by heat rather than glues – this is good for Warmcel insulation made from recycled newspaper).
For other insulation materials (e.g. standard mineral fibre types) it will be worth looking on the website of the manufacturer as they’ll usually have guidance sheets on how the material should be installed and what limitations there may be.
You can also see some information and examples on the Energy Saving Trust and Historic England websites.
For basic measures, checking around the house on a windy day is a good way to locate draughts. You must not block intentional vents such as wall vents (especially for rooms with a fire or stove), trickle vents on windows, and underfloor airbricks.
Wiper and compression seals are readily available for use on opening windows, external door frames and loft hatch. Foam types are cheaper but tend to wear out more quickly. Draught-proofing strips come in many types and thicknesses – so to choose the right one you need good measurements of the gaps you need to fill.
At the bottom of external doors you could add a batten along the bottom with a rubber flange or a strip of brushing. Internal doors to unheated rooms could have the same – or just use a draught-excluder.
Sash windows can be tricky – a brush seal may work, but some sort of secondary glazing will be better. See our page on windows for more.
Thick, well-fitting curtains will greatly reduce night-time heat loss from windows. Make sure curtains finish on a shelf above a radiator rather than hanging in front.
For letterboxes and old-fashioned keyholes you can buy special cover. Either board up and insulate an unused fireplace, or add a ‘chimney balloon’ if you’re planning to use the chimney in future.
For the gaps at skirting boards, between floorboards and around service ducts you can use a filler or sealant. Check that the type of filler (e.g. mastic or caulk) is suitable for the surfaces.
For big gaps you could wedge in wooden beading or round dowels. You can trim this to shape (using a surform or other tool) and tap into position using a dab of wood glue. The added wood could be stained to match surrounding timber.
A more in-depth approach to air-tightness would involve a full test with blower door equipment. As well as measuring heat loss more precisely, this helps identify the less obvious draughts through the building fabric.


WANT TO LEARN MORE?
Come on one of our practical eco-renovation short courses.

Did you know we are a Charity?
If you have found our Free Information Service useful, why not read more about ways you can support CAT, or make a donation.
Email Sign Up
Keep up to date with all the latest activities, events and online resources by signing up to our emails and following us on social media. And if you'd like to get involved and support our work, we'd love to welcome you as a CAT member.
Follow us


