Ask an expert: eco refurbishments
Share on social
Want to refurbish your home in a sustainable way? With over 25 years’ experience, including as tutor on CAT’s Eco Refurbishment course, Nick Parsons has some great advice – here are his top tips.
1. Make it air-tight.
Stop unintentional ventilation (this involves designating an air-tightness layer – and sticking to it!) and design in sufficient intentional ventilation. For a whole-house retrofit this will almost certainly be whole-house mechanical ventilation with heat recovery (MVHR), but for incremental retrofits, or those with less stringent air-tightness targets, passive ventilation may suffice.
2. Insulate, insulate, insulate!
Don’t automatically believe that Building Regulations standards of insulation are enough. They aren’t bad, but in many cases we should be aiming for far better. If you have the space – and the money – Passive House levels of insulation (U values of 0.15W/m2K or less) and air-tightness (less than one air change per hour for the refurbishment EnerPHit standard) can dramatically reduce your heating requirements and massively improve comfort.
3. Insulate externally! (Unless you can’t…)
External insulation of solid walls, if detailed properly, puts the entire building fabric inside a warm ‘tea-cosy’. But it does make your house look different.
4. Risk-manage your insulation
If you have to insulate your solid walls – or sometimes even add insulation to your cavity walls – internally, excellent detailing is critical. Insulating walls internally makes the room warmer but makes the walls themselves colder and more at risk of interstitial condensation – condensation within the new thickness of the wall, behind the insulation. This can rot joist ends and other embedded timbers, and maybe grow mould. Cold walls may also suffer from deterioration of the masonry due to frost damage.
If you insulate internally, make the whole process a documented risk management exercise – identify the risks, identify control measures and document how you will implement them. In certain circumstances, consider embedding sensors and monitoring equipment in hidden timbers so that you can know if moisture levels become critical. The expense may be off-putting, but it will be a great deal less than the remedial works if you have inadvertently shortened the life of your house by doing what you thought was the ‘right thing’.
In general the use of ‘breathable’ (water-vapour-permeable) insulants such as wood-fibre or cork may reduce risks, but very careful detailing is still required.
Greater risks exist with non-breathable insulants, but if they are installed with extreme care, the risks may be capable of being ‘managed’ and minimised. If you are installing them yourself, take advice from someone with a lot of experience. If someone else is installing them for you, are they experienced with such boards? Do they fully understand interstitial condensation and vapour control layers (VCLs)? Have they read the manufacturer’s installation instructions?
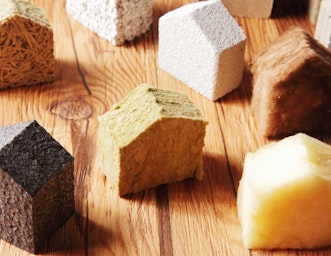
5. …and consider its environmental impact
Materials such as plastic insulation – made from crude oil – are high in embodied energy (the energy, including transport, used to get the product from raw material to the merchant’s shelf), but look at the units used. If the measure is weight, a heavy bit of ‘green’ insulation may be higher in embodied energy than a much lighter piece of ‘non-green’ insulation.
You may in any case wish to avoid wherever possible materials made from petrochemicals.
But ‘environment’ may mean more than ‘the world in general’. What about your immediate living environment? You may feel better in a room lined with vapour-permeable, moisture-buffering wood-fibre than in a room lined with petrochemical-based insulation.
6. Minimise thermal bridging
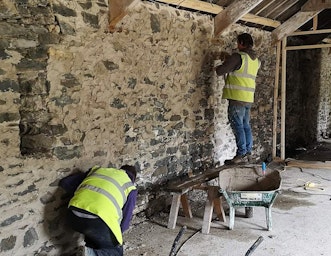
 You may believe – perhaps because your builder or consultant told you – that having low (good) U values guarantees good performance but thermal performance may be let down by weak-points in the insulation layer. Typically this would be where partition or party walls interrupt the insulation layer, where walls turn into windows or doors, or where internal insulation has to be thinner to accommodate fixtures or fittings. In practice, your U value may not be as low as you believed it to be.
The picture on the left shows: on the left, a wall prepared for insulation to ‘return’ on to internal wall to cloak the thermal bridge; in the middle, Pavadentro wood-fibre board prior to plastering; and on the right an existing brick wall with a lime ‘parge coat’ (air-tightness layer) to reduce air-leakage through voids in the brick wall.
7. Minimise thermal by-pass
Thermal by-pass, or ‘wind-wash’, occurs when cold air is allowed to get to the ‘warm side’ of the insulation. This can best be explained in two scenarios:
The first is a loft-conversion. The eaves areas are cold voids. The stud walls to the room (which are built off the floorboards) have been insulated to a good standard but there is only 100mm of insulation between the 150mm floor joists.
The ventilation air which enters at the eaves vents (a good ‘howling gale’ to keep all the timbers healthy) can blow directly under the floor of the heated bedroom, providing instant cooling!
Small pieces of plywood or similar board, sealed at all perimeters, placed between the joists at the edge of the floor on both sides of the bedroom will cure the problem. ‘Plugs’ of quilt insulation placed in the gaps will not do such a good job (as quilt insulation is generally air-permeable), but will be better than nothing. Once these gaps have been sealed, the insulation should in any case be increased to approximately 300mm.
The second scenario involves insulation to the sloping ceilings above an attic bedroom, carried out, as the law requires, by roofing contractors when re-roofing the house.
The house was sold and the new owner decided to remove all the attic ceilings. All but about six of the sheets of insulation fell out from between the rafters. What this tells us is that, while the insulation was in place, the cold air in the ventilation gap between the insulation and the slates was able to migrate to the warm side of the insulation, rendering the insulation almost useless.
8. Plan to do it all!
Many insulation plans are carried out incrementally, perhaps as other work is required, or when a room needs comprehensive re-decoration or (externally) when the cost of re-pointing an elevation can be avoided and put towards the cost of externally insulating that elevation.
When planning your works, ideally plan to do the whole house, even if you know it is going to take you 10 years to achieve it. I’m 29 years in and starting to re-do the internal insulation using better materials and methods than were available in 1987! Plan how your individual works are going to ‘knit together’ so as to limit thermal bridges, where condensation and mould may otherwise occur.
Above all, you don’t want your works – undertaken with the best of intentions – ultimately to shorten the life of your house.
 About the author
Nick Parsons has worked in energy-efficient and sustainable building and renewable energy for over 25 years. He provides consultancy and project management services to individuals, small businesses and community organisations and is a regular tutor at CAT and elsewhere. See www.sustainablebuilding.org.uk for details.
CAT courses
Nick teaches on our Eco Refurbishment short course. Click here to see upcoming Eco Refurbishment and similar courses.